
Can you teach a dog to stand? Yes, absolutely! Teaching your dog to stand is a fun and rewarding experience that strengthens your bond and can be a foundation for many other tricks. This guide will walk you through the simple steps involved in dog standing training, making it accessible even for beginners. Whether you have a bouncy puppy or a seasoned canine companion, teaching a dog to stand is a achievable goal with patience and the right approach.
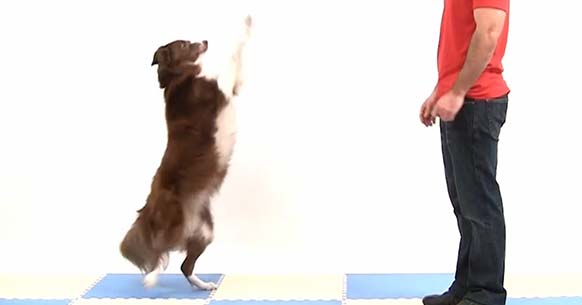
Image Source: www.successdogs.com
Why Teach Your Dog to Stand?
Teaching your dog to stand on command offers numerous benefits beyond just a cute trick. It’s a fantastic way to boost their confidence, improve their body awareness, and enhance your communication. It also serves as a building block for more complex dog obedience training stand exercises, like “down-stay” transitions or even more advanced maneuvers.
Benefits of Dog Standing Training
- Mental Stimulation: Learning new commands keeps your dog’s mind active and engaged, preventing boredom.
- Physical Coordination: Encouraging your dog to lift their hindquarters or stand tall can improve their balance and proprioception (their sense of their body in space).
- Bonding: Training sessions are quality time spent with your furry friend, reinforcing your connection.
- Confidence Building: Successfully learning a new trick boosts a dog’s self-esteem.
- Foundation for Other Tricks: A reliable “stand” cue can be integrated into sequences for more elaborate tricks.
Getting Started: Preparation is Key
Before you begin dog on hind legs training or simply a basic stand, ensure you have the right tools and environment.
Essential Supplies
- High-Value Treats: Small, soft, and incredibly tasty treats work best. Think tiny pieces of chicken, cheese, or commercial training treats. These are what will motivate your dog to perform the desired action, especially when dog standing up for treats.
- Clicker (Optional but Recommended): A clicker is a precise marker tool that tells your dog exactly when they’ve done something right.
- Quiet Training Area: Choose a space free from distractions where your dog can focus. This could be a quiet room in your house or a fenced backyard.
Setting the Right Mindset
- Patience: Every dog learns at their own pace. Celebrate small successes and don’t get discouraged by setbacks.
- Positive Reinforcement: This is the cornerstone of effective dog training. We’ll focus on rewarding desired behaviors, making training enjoyable for your dog.
- Short Sessions: Keep training sessions brief, around 5-10 minutes, especially when starting. This prevents your dog from becoming tired or frustrated.
Teaching a Basic Stand
This is the most straightforward way to teach dog to stand on command. It’s about reinforcing the natural behavior of standing.
Step 1: Luring the Stand
- Hold a Treat: Hold a high-value treat in your hand, close to your dog’s nose.
- Lure Forward: Slowly move the treat from their nose towards their shoulder. Most dogs will naturally stand to follow the treat.
- Mark and Reward: The moment your dog stands, click your clicker (if using) and immediately give them the treat.
- Repeat: Practice this several times in short bursts. You’re aiming for your dog to stand as you lure.
Step 2: Adding the Cue
- Say the Cue: Once your dog is reliably standing when you lure, start saying your chosen cue word – “Stand,” “Up,” or “Stand Up” – just as you begin to lure them.
- Lure and Reward: Continue to lure, mark, and reward the stand.
- Fade the Lure: Gradually make your lure motion smaller and less obvious. Eventually, you should be able to say the cue and make a very small hand movement (or no movement at all) and have your dog stand.
Step 3: Generalizing the Command
Once your dog reliably stands in your quiet training area, start practicing in different locations and with mild distractions. This helps them understand that the command applies everywhere, not just in one specific spot.
Teaching Your Dog to Stand on Command for Longer Durations
This builds upon the basic stand and focuses on teaching your dog to hold a stand.
Step 1: Increasing Duration
- Initial Stand: Ask for a stand using your cue.
- Short Hold: Wait just one second before you click and reward.
- Gradual Increase: Slowly increase the amount of time you wait before clicking and rewarding. Go from 1 second to 2 seconds, then 3, and so on.
- Watch for Breaking: If your dog breaks the stand before you reward, you’ve increased the duration too quickly. Go back to a shorter hold.
- Release Cue: Introduce a release cue like “Okay!” or “Free!” to signal when they can move.
Step 2: Adding Distance
- Ask for Stand: Have your dog stand.
- Step Back: Take one small step back while they are standing.
- Reward: If they hold the stand, click and reward.
- Increase Distance: Gradually increase the distance you step back. If they break, you’ve gone too far, too fast.
Step 3: Adding Distractions
Start with very mild distractions and slowly build up.
- Tossing a Treat: Toss a treat a short distance away. If your dog stands, click and reward. If they break the stand to chase the treat, you may need to make the distraction less intense.
- Movement: Have someone walk slowly past in the distance.
- Environmental Changes: Practice in different rooms, outside, or with other calm people present.
This advanced dog standing training requires consistent practice and patience.
Teaching Your Dog to Rear Up (Dog Rear Up Training)
This is a more advanced trick that requires your dog to stand on their hind legs. It’s important to note that not all dogs are physically suited for this trick, and it should only be taught to healthy dogs with no underlying joint or back issues. Always prioritize your dog’s well-being.
Step 1: Encouraging Weight Shift
- Treat Lure: Hold a treat slightly above and in front of your dog’s nose.
- Lift the Treat: Slowly raise the treat upwards, encouraging your dog to stretch and lift their front paws off the ground.
- Mark and Reward: The instant their front paws leave the ground, click and reward. You might only get a few seconds of weight on their hindquarters initially.
- Short Bursts: Keep these sessions very short.
Step 2: Building Duration and Height
- Gradual Lure: As your dog gets comfortable lifting their paws, gradually raise the treat higher, encouraging them to balance for longer.
- Clicker Timing: Precise clicker timing is crucial here. Click the moment they achieve the desired pose.
- Add the Cue: Once they are lifting their paws consistently when you lure, start adding a verbal cue like “Up” or “Rear Up” just as you begin the lure.
- Fade the Lure: Slowly reduce the lure movement, relying more on the verbal cue and a subtle hand signal.
Important Considerations for Dog Rear Up Training
- Surface: Practice on a non-slip surface like carpet or a yoga mat to prevent slips.
- Physical Limitations: If your dog shows any signs of discomfort, pain, or difficulty, stop immediately. Consult your veterinarian if you have concerns about your dog’s physical health for this trick.
- Avoid Forcing: Never force your dog into a position. This training relies on positive reinforcement and their willingness to perform.
- Safety First: This trick is not suitable for very young puppies, elderly dogs, or dogs with orthopedic issues.
Teaching Your Dog to Balance on Hind Legs
This is closely related to the rear-up trick and focuses on the teaching a dog to balance aspect.
Step 1: Building Paw Awareness
- “Touch” Cue: If you haven’t already, teach your dog a “touch” cue where they touch your hand or a target with their nose.
- Targeting with Paws: Place your hand on the floor in front of your dog. When they investigate, click and reward.
- Lifting Paws: Gradually lift your hand slightly off the floor. Click and reward any paw lift or attempt to reach your hand.
Step 2: Encouraging Weight Shift
- Treat Lure: Hold a treat near the floor, but just out of reach, encouraging your dog to stretch forward.
- Slight Lift: As they stretch, subtly guide the treat upwards, encouraging them to shift their weight onto their hind legs.
- Mark and Reward: Click and reward any shift in weight or lift of front paws.
Step 3: Holding the Balance
- Slight Hover: Once your dog is comfortable lifting their paws for a moment, start holding the treat slightly higher for a second or two longer before rewarding.
- Incremental Increases: Gradually increase the time your dog needs to hold the pose.
- Introduce the Cue: As with other tricks, add a verbal cue like “Balance” or “Up” as they begin to lift.
Remember, teaching a dog to balance is a progression. Celebrate small victories and don’t rush the process.
Puppy Standing Trick
Teaching your puppy standing trick is a great way to introduce them to training and build good habits. Puppies have short attention spans, so keep it fun and positive.
Age Appropriateness
- Start Early: You can start basic standing training as soon as your puppy is comfortable and settled in your home, usually around 8-10 weeks old.
- Gentle Approach: Avoid any maneuvers that could strain their developing joints. Focus on rewarding natural behaviors.
Tips for Puppies
- High-Value Rewards: Puppies are highly motivated by tasty treats and praise.
- Short, Frequent Sessions: Multiple 2-3 minute sessions throughout the day are more effective than one long session.
- End on a High Note: Always try to end the training session with a successful attempt and a big reward.
- Socialization: Ensure your puppy is well-socialized alongside their training.
Teaching Your Dog to Hold a Stand
This is about duration and stillness. It’s a fundamental part of many obedience commands and trick training.
Key Principles for How to Get Dog to Hold a Stand
- Clear Criteria: Decide what constitutes a “held” stand. Are their feet moving? Are they shifting weight excessively?
- Gradual Duration: As mentioned before, slowly increase the time your dog must hold the stand.
- Proofing: Practice in various environments with increasing distractions.
- Reinforcement Schedule: Vary the rewards. Sometimes give a jackpot of treats, sometimes just one.
- Release Cue: Always use a clear release cue so your dog knows when the “hold” is over.
Common Challenges and Solutions
| Challenge | Solution |
|---|---|
| Dog breaking the stand quickly | Break down the duration further. Reward for holding for even shorter periods. Ensure treats are high-value and the environment is calm. |
| Dog sitting or lying down | Ensure your lure is guiding them into a stand, not a sit or down. If they start to sit, gently interrupt and try again. |
| Dog backing up | Practice near a wall initially to prevent backing up. Reward when they stand in place. |
| Dog not showing interest | Try different, higher-value treats. Make the session more engaging and fun. Ensure your dog isn’t tired or stressed. |
| Dog is anxious or scared | Slow down the process significantly. Go back to basic luring. Use extra praise and gentle encouragement. Consult a professional if needed. |
Dog Rear Up Training: Safety First!
As discussed earlier, dog rear up training is an advanced trick and safety is paramount.
Is Your Dog a Good Candidate?
- Breed: Some breeds with a more robust build and good core strength are better suited. However, individual fitness is more important than breed.
- Age: Avoid this trick with very young puppies or senior dogs.
- Health: Dogs with hip dysplasia, arthritis, spinal issues, or other orthopedic conditions should not perform this trick. Consult your veterinarian.
- Temperament: Your dog should be confident and willing to try new things.
How to Ensure Safety
- Supervise: Always supervise your dog during training and when they perform the trick.
- Surface: Always use a soft, non-slip surface.
- Duration: Keep the rear-up pose brief. Don’t ask them to hold it for long periods.
- No Force: Never force your dog into the position.
- Listen to Your Dog: If your dog shows any sign of discomfort, stop immediately.
Frequently Asked Questions About Dog Standing Training
Q1: How long does it take to teach a dog to stand?
A1: Teaching a basic stand can take anywhere from a few days to a couple of weeks, depending on your dog’s age, breed, prior training experience, and your consistency. Teaching to hold a stand for longer durations or to rear up will take significantly longer, often weeks or months of consistent practice.
Q2: What is the best age to start teaching a puppy to stand?
A2: You can start teaching a basic stand trick to a puppy as young as 8-10 weeks old, once they’ve settled into your home. For more advanced moves like standing on hind legs, it’s best to wait until their growth plates have closed, typically around 12-18 months of age, and after consulting with your veterinarian.
Q3: My dog keeps sitting down when I try to teach them to stand. What am I doing wrong?
A3: This usually means your lure or cue isn’t clear enough, or you’re not marking and rewarding the stand quickly enough. Ensure you are marking the exact moment their rear end is on the ground and their front paws are lifted. If they start to sit, reset and try again with a clearer lure.
Q4: Can I teach my dog to stand on command without treats?
A4: While it’s possible to train without treats using other motivators like praise, toys, or life rewards (like getting to go outside), treats are highly effective, especially for learning new behaviors. High-value treats are excellent for dog standing up for treats and can accelerate the learning process.
Q5: My dog is scared to lift their paws for the rear-up trick. What should I do?
A5: If your dog shows fear, you’ve likely progressed too quickly. Go back to basics. Encourage just the slightest shift of weight, or even just a slight lift of one paw, and reward that. Make it a very positive and safe experience. If the fear persists, this trick might not be suitable for your dog.
Q6: How do I teach my dog to hold a stand for a long time?
A6: To teach your dog to hold a stand, you need to gradually increase the duration. Start with just one second, then two, then three, always rewarding the successful hold. Use a clear release cue and practice in different environments to generalize the skill. If your dog breaks the stand, you’ve asked for too long a duration; go back to a shorter time.
Q7: Is dog rear up training harmful to my dog?
A7: Dog rear up training can be harmful if not done correctly, especially for dogs with underlying health conditions or if the dog is forced or made to hold the position for too long. Always ensure your dog is physically healthy for this trick, practice on a safe surface, keep the duration short, and never force them. Consult your vet if you have any doubts.
By following these steps and using positive reinforcement dog standing methods, you can successfully teach your dog to stand on command, enhancing your relationship and providing valuable mental and physical stimulation. Enjoy the training journey!